Welcome to designers blog here i have posted how to import local sever database to live server
database in wordpress
Step1:
Export the database from local server phpmyadmin -
databasename -
themes
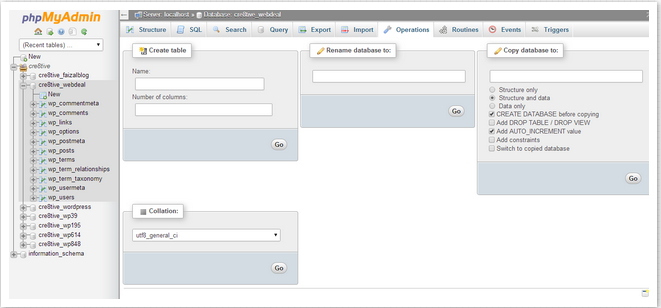
Step2:
Go to live server - Create new - new Database name - which is start with prefix Cre8tive_
so we have to give our new database with name called
Cre8tive_webdeal
Step3:
We have to create the username and password for the database
Step4:
Add user to database selecting in drop-down menu and add
Step5:
Make sure all the privileges tick and click make changes
Step6:
Go to PhpMyAdmin u will see the added database name - Cre8tive_webdeal
Step7:
Now you have to import the database themes to live server
live server database name is Cre8tive_webdeal and the local database is themes so there is
major different in case you upload it will get fail
Step8:
To import the local database to live server u have open the export file
themes.sql in the notepad
or Dreamweaver editor and
change the database : cre8tive_webdeal
--
-- Database: `cre8tive_webdeal`
--
CREATE DATABASE IF NOT EXISTS
`cre8tive_webdeal` DEFAULT CHARACTER SET latin1 COLLATE latin1_swedish_ci;
USE `
cre8tive_webdeal`;
Now u can import the file successfully
Step10:
Changing the Site URL
Now you need to change the site URL, so you can setup your live
WordPress site. In your
phpMyAdmin, look for the wp_options table in
your database that we just imported in step 4. If you
changed your database prefix
, then instead of wp_options it might be {prefix}_options.
Click on the browse button next to wp_options or the link that you
see in the sidebar to open the
page with a list of fields within the
wp_options table. See screenshot below:
Under the field
options_name, you need to look for
siteurl. Click the Edit Field icon which can be
found at the far left at the beginning of the row.
When you click the edit field, an edit field window will appear. In
the input box for option_value,
you will see the URL of your local
install probably something like:
http://localhost/test.
Carefully insert your new site url in this field, for example:
http://www.wpbeginner.com Save the
field by clicking the Go button.Next, you need to replicate this step for the option name:
home.
The
wp_options page can be a few pages long, so simply find the home
tab. Usually it is on the second
page which you can navigate to by
clicking on the pagination arrows in phpMyAdmin.
Update the
home url to be the same as your
siteurl.
Step10:
You have to change the
WP-config file since you have upload or install WordPress form your local
server files.
Open the Wp-config file and change the
1.define('DB_NAME', '
cre8tive_webdeal'');
2. define('DB_USER', '
cre8tive_web');
3.define('DB_PASSWORD', '
web123');
// ** MySQL settings - You can get this info from your web host ** //
/** The name of the database for WordPress */
define('DB_NAME', '
cre8tive_webdeal');
/** MySQL database username */
define('DB_USER', '
cre8tive_web');
/** MySQL database password */
define('DB_PASSWORD', '
web123');
/** MySQL hostname */
define('DB_HOST', 'localhost');
/** Database Charset to use in creating database tables. */
define('DB_CHARSET', 'utf8');
/** The Database Collate type. Don't change this if in doubt. */
define('DB_COLLATE', '');
Step11:
Now Access the Live url you will see the similar local server files
Enjoys folks
.........................