Search This Blog

Showing posts with label Wamp Server. Show all posts

Saturday, July 5, 2014

Updraged windows 7 to 8 or 8.1 wampserver

Welcome to designers blog here i have posted how to Upgraded wampserver when you upgrade the

operating system to

Step1:

1.Window 7  to windows 8

2. windows 8 to  windows 8.1

Step2:
Click on wampmanager -> MySQL -> Service -> Install Service

Click on wampmanager -> Apache -> Service -> Install Service


Step3:

Then restart all services


Step4:

When Green Symbol comes your Wamp Server in Active . Enjoy Folks.................................

Tuesday, July 23, 2013

How to import large sql file in wamp using phpMyAdmin


 Fatal error:   

  Maximum execution time of 300 seconds exceeded in

 C:\wamp\apps\phpmyadmin3.3.9\libraries\dbi\mysqli.dbi.lib.php

Solutions : 1

Step 1

Go to to phpMyAdmin folder usually it is located in "C:\wamp\apps\phpmyadmin3.4.5".

Step 2

Open config.inc.php file.

Find the code  

$cfg['UploadDir'] =''; and replace it with $cfg['UploadDir'] = 'upload';

add the new line

$cfg ['ExecTimeLimit'] = 0;

Save config.inc.php file.

Step 3 

Now u can upload 3mb sql file  in phpmy admin

Step4:

Enjoy Folks


Solutions : 2

You can change these values by left clicking wamp > php > php.ini


Find:
post_max_size = 8M
upload_max_filesize = 2M
max_execution_time = 30
max_input_time = 60
memory_limit = 8M

Change to:
post_max_size = 750M
upload_max_filesize = 750M
max_execution_time = 5000
max_input_time = 5000
memory_limit = 1000M

Monday, April 29, 2013

increase file size in wamp server to upload the images

 Welcome to Designers Dairy blog here i have posted How to increase  file size in wamp server to

upload the images

Step1:

Change the settings in C:\wamp\bin\apache\apache2.2.8\bin\php.ini

Find:
post_max_size = 8M
upload_max_filesize = 2M
max_execution_time = 30
max_input_time = 60
memory_limit = 8M

Change to:

post_max_size = 750M
upload_max_filesize = 750M
max_execution_time = 5000
max_input_time = 5000
memory_limit = 1000M

Then restart wamp to take effect


Have the Fun

Thursday, April 25, 2013

Changing the Localhost url to 8080


Step 1:

         Go to Wamp -> Open Wamp manager.in file

Step 2:

         Change everywhere localhost to - > localhost:8080

Type: submenu; Caption: "http://localhost:8080/phpmyadmin/"; SubMenu: alias_phpmyadmin; Glyph: 3
Type: submenu; Caption: "http://localhost:8080/sqlbuddy/"; SubMenu: alias_sqlbuddy; Glyph: 3
Type: submenu; Caption: "http://localhost:8080/webgrind/"; SubMenu: alias_webgrind; Glyph: 3


Step 3:

          Go to Wamp -> Open Wamp manager.tpl  file


       Change to everywhere localhost  - > localhost:8080

Type: item; Caption: "${w_localhost}"; Action: run; FileName: "${c_navigator}"; Parameters: "http://localhost:8080/"; Glyph: 5
Type: item; Caption: "${w_phpmyadmin}"; Action: run; FileName: "${c_navigator}"; Parameters: "http://localhost:8080/phpmyadmin/"; Glyph: 5


Step 4:

Exit the Wampserver and run


Sending the email from WAMP Server

This solution requires sendmail.exe (a Command Line Interface (CLI) executable which accepts email from PHP, connects to an SMTP server and sends email). You will not require to use it by command, don’t bother about it :-) Download the sendmail.zip and follow these steps:

Step1 : Download the Sendmail.zip file

Step2:  Create a folder named “sendmail” in “C:\wamp\”.

Step3:   Open the “sendmail.ini” file and configure it as following

              Change the Following codes

             1.   smtp_server = mail.mydomain.com  ->    smtp_server = smtp.gmail.com

             2.  smtp_port = 25 - > smtp_port = 465

             3. smtp_ssl=auto  -> smtp_ssl=ssl

             4. ;default_domain=mydomain.com -> default_domain=localhost

                                                            (remove the ‘ ;’  in default_domain to enable the code )

              5.  error_logfile = error.log

              6.   ;debug_logfile=debug.log -> Remove ; to enable

               7.   auth_username= [your_gmail_account_username]@gmail.com
                     auth_password= [your_gmail_account_password]
 
                8.  pop3_server=

                9.  pop3_username=

                10. pop3_password=

                 11. force_sender=

                 12 .force_recipient=

                 13. hostname=     ->  hostname =  localhost


Step4:

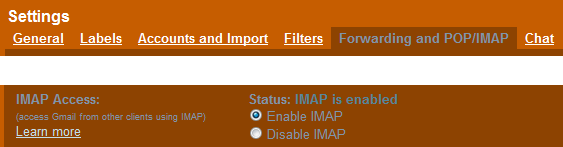
 Enable IMAP Access in your GMail’s Settings -> Forwarding and POP/IMAP -> IMAP Access:


  Step5:
          
 Enable “ssl_module” module in Apache server:


  Step6:  

 Enable “php_openssl” and “php_sockets” extensions for PHP compiler:


Step7:

Open php.ini from “C:\wamp\bin\apache\Apache2.2.17\bin” and configure it as following

 (The php.ini at “C:\wamp\bin\php\php5.3.x” would not work) (You just need to configure the last line in the following code, prefix semicolon (;) against other lines):

[mail function]
; For Win32 only.
; http://php.net/smtp
;SMTP =
; http://php.net/smtp-port
;smtp_port = 25

; For Win32 only.
; http://php.net/sendmail-from
;sendmail_from = you@domain.com
; For Unix only.  You may supply arguments as well (default: "sendmail -t -i").
; http://php.net/sendmail-path
sendmail_path = "C:\wamp\sendmail\sendmail.exe -t -i"
 

Step8:

  Restart WAMP Server.

And Check mail  will be go smoothly


Tuesday, November 20, 2012

WAMP Server Installation Guide for Windows 7 32/64 Bits

Welcome to designers blog here i have posted how to use wamp server in window 7

By default WampServer is installed to port 80 which is already used by IIS. To set WampServer to use an open port, left click on the WampServer icon in the system tray and go to Apache > httpd.conf
Open the httpd.conf in Notepad. press ctrl+f and search for 

"Listen 80", change this line to "Listen 8080"

  (u can change this port as what you want), and then close and save the httpd.conf file.

Open a web browser and enter  this will open the WampServer configuration page where you can configure

Apache, MySQL, and PHP.and some times this problem may occur because of skype also use 80 as default


Now you can see WampServer icon on the taskbar. WampServer icon has three states.
  • Red
  • Yellow
  • Green
Red:


Yellow


Green:


When Green Symbol comes your Wamp Server in Active .


Validating to select in sequencial order using angular

    < input type = "checkbox" (change) = "handleSelectTaskItem($event, taskItem)" [checked] = " taskItem . i...