What Does the Structured Data Markup Helper Do?
Titles
like “Structured Data Markup Helper” need a little explanation, so let
me first explain a little bit about this tool before launching into a
demonstration. I want you to see how and why the helper can be helpful.
The Tool Explained
Stated simply, the Structured Data Markup Helper is designed to help you implement structured data on your site.
Structured data is information organized in vast online databases (e.g.,
freebase)
that help to serve search results. Structured data markup is a
universally shared language format that helps search engines understand
and return the best results for users who are searching for relevant
data. Schema markup is the foremost type of shared markup vocabulary
that Google is using to deliver results.
The helper shows where you can add markup and how to do it.
A Word About Structured Data
As
search marketing evolves and advances, it’s very likely that the common
markup vocabulary will spread wider across a variety of applications
and interfaces, making markup even more essential.
Marketers
cannot simply ignore structured data. In the aggressive pursuit to
organize everything, structured data will become (and maybe has already
become) a foundational building block of an effective marketing and
search strategy.
Why Do I Need This tool?
If you’re
skeptical about using a Google tool to help you “succeed” in Google
search, I understand. But look at it this way. Google is sharing
information that will actually improve your results both in their search
results and in other search engine results. After all, the markup
syntax is shared across major search engines.
As Google explains, they want to “improve the web by creating a
common vocabulary
for describing data on the web” (emphasis mine). This commonality means
that you’re enhancing something bigger than just Google’s SERPs.
Besides,
you have a shared goal with Google. (Yes, really.) Google wants to give
users the best information. You, hopefully, have the same desire — to
give users the best information possible.
What Technical Skills Do I Need?
Do you need to be a web developer to implement structured data markup? No, although it probably helps.
The
actual process of implementing the markup uses Microdata or JSON-LD.
Microdata is HTML5 with nested entities and referred items. It helps
crawlers understand the type and identity of certain data points, and
then deliver visually differentiated results to users.
JSON-LD uses JavaScript objects to define the data.
JSON stands for JavaScript Object Notation.
LD stands for “linked data.” It’s
like JavaScript,
but its primary purpose is object identification, which is the
motivating purpose behind structured data markup as a whole.
Google prefers microdata, as explained in a
webmaster support article:
“Google prefers microdata for web content.” Thus, if you are embarking
on your own markup journey, use microdata. If you already know
JavaScript, it shouldn’t be too much of a jump to switch to microdata
instead.
But what if you know neither Java nor microdata, and are
even struggling to understand the basics of HTML? Not to worry. The
Structured Data Markup Helper provides a clear way to understand what
you need to do.
Using the Structured Data Markup Helper
Now, let’s get started with the helper.
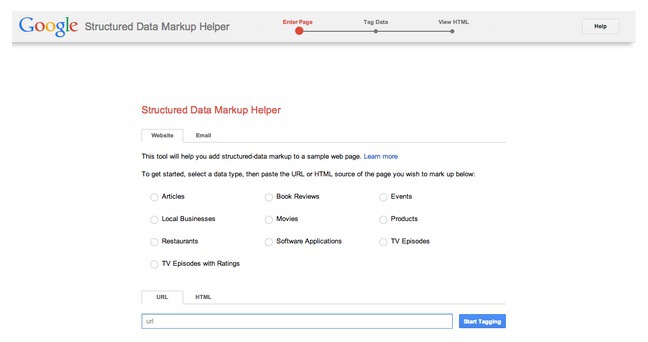
Step 1: Open the Markup Helper
URL:
https://www.google.com/webmasters/markup-helper/u/0/
You’ll need to sign in to your Google account in order to use the tool.
Here’s what you’ll see:

Step 2: Choose to Add Structured Data Markup to an Email or to a Web Page
Structured
data markup works on web pages or emails. Its use on a web page will be
obvious in this article, but let me just remark on the email
implementation.
Obviously, the markup will appear only if you’re
creating an HTML email. You can create your template as usual, then run
it through the markup helper to add features such as event reservations,
flight reservations, restaurant reservations, hotel reservations, and
car rental reservations.
You can read more about
email markup in Google’s webmaster article.
For
my explanation purposes, I’m going to use a web page. I will make sure I
have selected the “website tab” on the markup helper as I go forward.
Step 3: Determine What Kind of Data Type You’re Going to Use
Now,
you have to select a data type. Data type simply refers to anything on
your page that might be categorized as an entity or data point.
- Your name as an author is data.
- Your local business listing is data.
- Your flower bouquet for sale is data.
- Your review of book is data.
Google
wants to understand how your data should be categorized. Making this
choice will tell the Markup Helper how to serve data options that you
can use to markup your page.
So, simply decide what you want to markup. You have ten choices:
- Articles
- Book Reviews
- Events
- Local Businesses
- Movies
- Products
- Restaurants
- Software Applications
- TV Episodes
- TV Episodes with Ratings
It seems a bit limited, but don’t worry. Once you get into the markup, you’ll have plenty of choices for what can be marked up.
I’m going to use “Article” for my markup sample.
Step 4: Paste in Either the URL or HTML of the Web Page
If
you have an already-published web page, pasting the URL is the simplest
and most obvious way to go. Google will access your site, and deliver
it in the markup helper.
If you’re creating a page that is not
published yet, you can simply paste the HTML into the markup helper.
It’s best if you have a complete or nearly complete page, even if it
hasn’t been published. The more complete the web page, the better you’ll
be served by the markup helper.
I’m going to use the URL of a random blog article that I published in the past on
Search Engine Journal.
Once you paste in the URL (or HTML), click “start tagging.” You’ll be prompted to start tagging data.

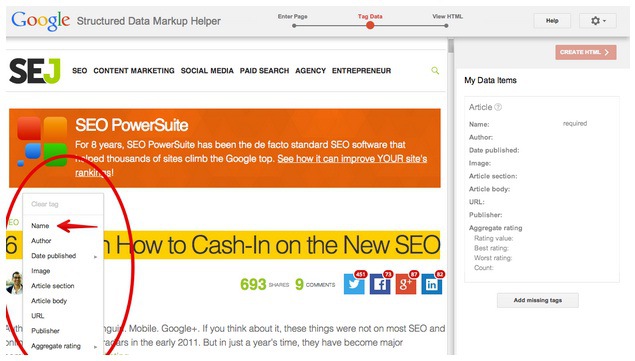
Step 5: Select Data and Identify its Data Type
Now,
you will identify the pieces of information on the web page that should
be marked up. This is the longest but most important step, so track
carefully with me.
How do you know what elements on the web page
should be marked up? The right pane of the markup helper shows you.
Because you selected “article,” the helper lists the common data items
for an article.

The only required bit of information here is “Name.” The rest is optional, but recommended.
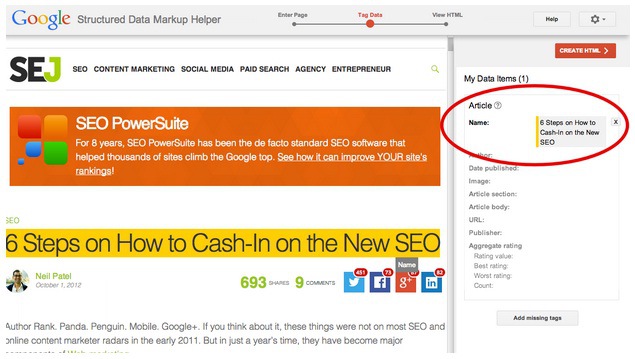
I’m
going highlight that first element in the list — “Name,” which refers
to the article title. When I highlight the title, the helper displays a
tooltip where I can choose the data item that I just highlighted.

Since this is the title of the article, I’ll choose “Name.”
Immediately, this data is added to the “My Data Items” pane, right next to the “Name” entry.

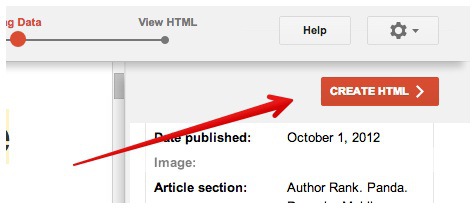
Next, I’ll look for the author, then date published, image, article selection, and so on. The more data I can tag, the better.
I’m not able to simply highlight
every element
and add it. That’s where I use the “Add Missing Tags” button at the
bottom of “My Data Items” in the right pane. Let me illustrate how I’ll
use this.

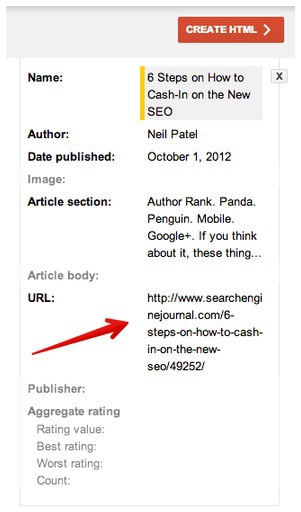
I
want to add the article’s URL, but it doesn’t appear on the page.
Therefore, I can’t highlight it. So, I select URL from the tag type, and
then copy (from elsewhere), and paste the URL from the article into the
“Add tag” section. Then I click “save.”
Now, I have the URL as part of my data items:

I’m
going to do the same for “Article Body,” and “Publisher.” I can
copy/paste the article body from elsewhere, and then I can simply type
in “Search Engine Journal” as the publisher.
You may not be able
to fill out every data item, and that’s okay. Some articles just won’t
have rating data, for example. I’m leaving this blank in my markup list.
Once you’ve tagged all relevant data, you’re ready to view the HTML — the final major step in the process.
Step 6: Create HTML
Click “Create HTML” in the upper right corner.

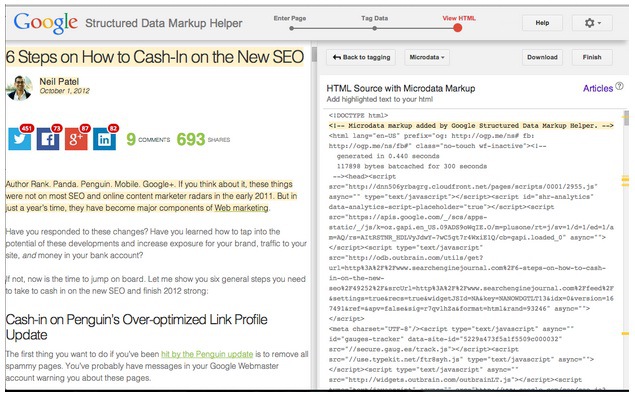
Once you do so, the right pane converts to an HTML display pane.

The
tool has provided exactly what you need to add markup to your article.
Every occurrence of added data is indicated with highlighted text.
Yellow location markers appear in the right scroll bar to alert you to
each incidence of added markup.
Notice that you can add/view
JSON-LD if you prefer. A simple toggle button at the top of the pane
allows you to switch between viewing the two — JSON-LD or microdata. As I
mentioned before, Google prefers microdata, so this is what I recommend
you use.
Step 7: Download or Add Microdata to Your HTML
Now,
you can download the HTML that you’ve created with the helper. If your
CMS allows you to simply paste in the HTML, use the “download” button,
then copy/paste it in.
NOTE: Google provides a note about their
microdata generation within your HTML. You do not need to include the
following line of HTML in your page:
<!– Microdata markup added by Google Structured Data Markup Helper. –>
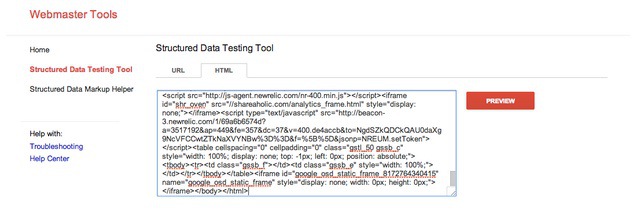
Step 8: Test the Markup That You Have Created
Finally, I recommend that you use
another Google tool to test your data — the Structured Data
Testing Tool. Whereas the Structured Data Markup Helper allowed you to
create the microdata, the Testing Tool allows you to check for accuracy.
The testing tool is available here:
http://www.google.com/webmasters/tools/richsnippets
Since I just downloaded the HTML for my marked up text, I’m going to paste it in, rather than use a live URL.

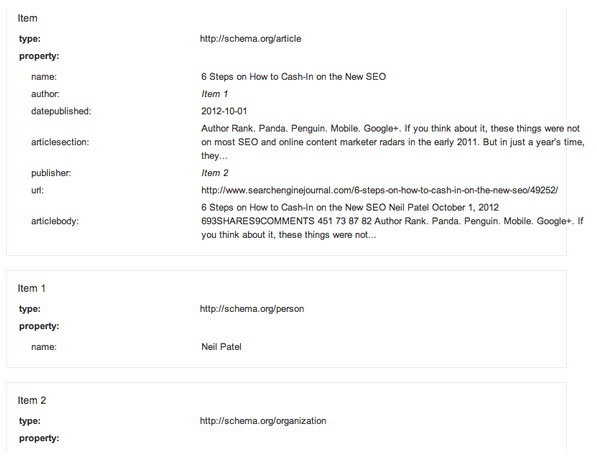
The
testing tool provides a helpful survey of the extracted structured
data. When I view the data elements, I can see that the markup I added
was implemented correctly.

Going Beyond the Structured Data Markup Helper
Article Credits goes to: searchenginejournal.com
http://www.searchenginejournal.com/use-googles-structured-data-markup-helper/110668/