Search This Blog

Friday, May 25, 2018

How to Turn SharePoint Summary Web part link as an accordion menu

Welcome to Designers dairy blog,Here we are going to discuss about, 

How to Turn  SharePoint Summary Web part  link as an accordion Menu


Step1:

Add the summary link webpart in Sharepoint ribbon

Webpart - > Content Rollup - >  Summary  Links

The Summary Link Web Part has a toolbar along the top, with these four options:
  • New Link: Click this button to link to a new item in the Web Part. You can link to a page, item, or person. You can also link to content outside SharePoint.
  • New Group: Create a new group that you can use to group the links you add to the Web Part.
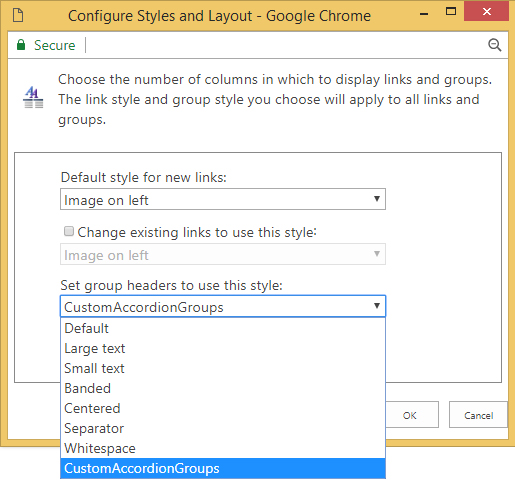
  • Configure Styles and Layout: Select the default style that’s applied to new links or change the style on all links you already entered into the Web Part.
  • Reorder: Move the items in the Web Part up or down to change the order.
As shown in below images


Step2:

Let us see, how to customize and add the new group header style in configure styles and layout.

Now, we are going to add the custom group header style called CustomAccordionGroups as shown in below image


Step3:

To add the custom style CustomAccordionGroups . You have to add  in Header.xsl file.

which is located in the below path :

Style Library/XSL Style Sheets/Header.xsl

Open the Header.xsl file and add the below XML template code  with the class
name CustomAccordionGroups

 <xsl:template name="CustomAccordionGroups" match="*[@GroupStyle='CustomAccordionGroup']" mode="header">
<div class="groupheader item accordionCustomHeaderItem">
<xsl:call-template name="OuterTemplate.GetGroupName">
<xsl:with-param name="GroupName" select="@*[name()=$Group]"/>
<xsl:with-param name="GroupType" select="$GroupType"/>
</xsl:call-template>
</div>
</xsl:template>

Once you added,  you will find the custom style CustomAccordionGroups in the drop down list


Step4:

Once you applied the CustomAccordiongroup to the Headers

Now I am going to making this web part into a fully functional accordion for this I added a 
CustomAccordiongroup.

Simple Jquery script the performs hide all hyperlinks in this groups and when a user clicks a group header, hide all sections that is not the current header and expand current selected link selection. 

So, adding the jquery library Reference
<script src="https://ajax.googleapis.com/ajax/libs/jquery/3.3.1/jquery.min.js"></script>

Script:

$(document).ready(function(){
$('.accordionCustomHeaderItem').click(function(){
   if( $(this).hasClass('active') ){
    $(this).removeClass('active');
    $(this).next().removeClass('show');
  }else{
    $('.accordionCustomHeaderItem').removeClass('active');
    $('.accordionCustomHeaderItem  + ul.dfwp-list').removeClass('show');

    $(this).addClass('active');
    $(this).next().addClass('show');
  }

})

});

CSS:

.accordionCustomHeaderItem  + ul.dfwp-list
{
display:none;

}
.groupheader {
       background-color: #921c1c;
color: white;
font-family: "Segoe UI", Tahoma, Geneva, Verdana, sans-serif;
font-size: 140%;
padding: 0.5em;
padding-left: 15px;
margin-right: 0.5em;
margin-bottom: 1px;
}

.accordionCustomHeaderItem:before {

    font-family: 'FontAwesome';
    content: "\f054";   
    font-size: 13px;
    padding-right:12px;
    padding-top: 6px;
    float: left;

}

.accordionCustomHeaderItem.active:before {
     content: "\f078";
     font-size: 13px;
     padding-top: 6px;
     float: left;
}

.groupheader-arrowdown {

        color: white;
font-family: "Segoe UI", Tahoma, Geneva, Verdana, sans-serif;
font-size: 140%;
padding: 0.5em;
padding-left: 35px;
margin-right: 0.5em;
margin-bottom: 1px;

}

.groupmarker:hover .groupheader{
cursor: pointer;
background-color: #e03628;
}

.dfwp-list {

margin-bottom: 0.5em;
margin-right: 0.75em;
}
.dfwp-list .item:hover  {

   text-decoration:underline;

}
.dfwp-list .link-item a {
margin-left: 2em;
color: black;
}
.show {

display:block !important;
}


Step5:

So Finally, Now you can able to see your web part work as an Accordion menu as shown below


Thanks for reading my article.Stay Tune on www.webdesignersdairy.com  for more updates on SharePoint.

Wednesday, May 9, 2018

How to make SharePoint Top navigation menu responsive in 2013 & 2016

Step1 :

Welcome to Designer dairy, Here we are going to discuss how to make SharePoint
Top navigation menu as responsive in 2013 & 2016 without installing 

"SharePoint Responsive UI Package"

Step 2:

There are some existing projects built in SharePoint 2013. where the client wish to make it portal responsive.As of now, Here we are not going to discuss about entire portal responsiveness only top navigation menu.

Step 3:


Search for “DeltaTopNavigation” in settle.master and select whole tag > Copy the code and place in between bootstrap navigation tags like below


Step 2-

Place these css in you css file-
/*************************************************************************/
.static,.dynamic {
    padding-left: 10px;
    padding-right: 10px;
}
.ms-core-listMenu-horizontalBox li.static > .ms-core-listMenu-item
{                margin-right:0px!important;
}
ul.dynamic li:hover {
    background-color: red;
}
.static.menu-item.ms-core-listMenu-item.ms-displayInline.ms-navedit-linkNode:hover {
    background-color: red;
}
.ms-core-listMenu-horizontalBox li.static > a{
display: none !important;
}
.ms-core-listMenu-horizontalBox li.static > ul a{
display: block !important;
}
@media screen and (max-width:767px) {
.ms-core-listMenu-horizontalBox ul, .ms-core-listMenu-horizontalBox li, .ms-core-listMenu-horizontalBox .ms-core-listMenu-item, .ms-core-listMenu-horizontalBox > ul > li > table
{
               
                display:block;
}
.hideonsmall
{
                display:none;
}
.navbar-inverse .navbar-toggle:hover, .navbar-inverse .navbar-toggle:focus {
    background-color: transparent!important;
}
.navbar-inverse .navbar-toggle {
    border-color: transparent!important;
}
.navbar-nav {
    margin: 7.5px -15px;
    padding-left: 15px!important;
    line-height: 25px!important;
}
.ms-core-listMenu-horizontalBox {
    color: #666666;
    display: inline-block;
    vertical-align: middle;
    line-height: 30px;
    height: auto;
}.ms-core-listMenu-horizontalBox {
                width:100%;
}.static, .dynamic {
    padding-left: 0px!important;
    padding-right: 0px!important;
}.menu-item-text {
    padding-left: 10px;
}
.navbar-collapse  {
                padding-left: 0px!important;
}
ul.dynamic
{
                left:25%!important;
}
}
Step4:

The final output of the screen will be like below screen.


Thanks for reading my article.Stay Tune on www.webdesignersdairy.com  for more updates on SharePoint.

Thursday, May 3, 2018

Creating News Ticker in SharePoint list item Using JSOM

Step1:

Welcome to the designers dairy blog, Here we are going to discuss, how to Create SharePoint 2013 & 2016 list  items into News Ticker using JSOM.

Step2:

Create a list name called Announcement as shown in below image


Step3:

The news lists have two feeds.


Step4:

Below are the code written in javascript function  Tickernews()  to retrieve  data from the list items using CAML Query. And Appending in the page  where u needed.


$(function () {

    ExecuteOrDelayUntilScriptLoaded(Tickernews, "sp.js");

});
  

function Tickernews() {

    var clientContext = new SP.ClientContext();

    var oList = clientContext.get_web().get_lists().getByTitle('Annoucement');

    var camlQuery = new SP.CamlQuery();    

    //camlQuery.set_viewXml("<View><RowLimit>1</RowLimit></View>"); 

   //camlQuery.set_viewXml("<View><Query><Where><BeginsWith><FieldRef Name='FirstName'/><Value Type='Text'>Raja</Value></BeginsWith>"

   //                    + "<Gt><FieldRef Name='ID' /><Value Type='Counter'>2</Value></Gt></Where></Query></View>"); 
   

 /*camlQuery.set_viewXml("<View>"

    +"<Query>"
   +"<Where>"
     +" <Or>"
     + "   <Eq>"
           +" <FieldRef Name='FirstName' />"
           +" <Value Type='Text'>Raja</Value>"
        +" </Eq>"
        +" <Gt>"
         +"   <FieldRef Name='ID' />"
          +"  <Value Type='Counter'>3</Value>"
        +" </Gt>"
      +"</Or>"
   +"</Where>"
+"</Query>"


 +"</View>");  */

   camlQuery.set_viewXml("<View><RowLimit>1</RowLimit></View>");
    
    this.collListItem = oList.getItems(camlQuery);

    clientContext.load(collListItem);

    clientContext.executeQueryAsync(Function.createDelegate(this, this.onTickerSucceeded), Function.createDelegate(this, this.onTickerQueryFailed));

}

function onTickerSucceeded(sender, args) {

    var listItemInfo = '';

    var listItemEnumerator = collListItem.getEnumerator();
    
    console.log(listItemEnumerator);

    while (listItemEnumerator.moveNext()) {

        var oListItem = listItemEnumerator.get_current();


        listItemInfo += '<div style="float:left; width:25%;"><strong>'+ oListItem.get_item("Title") + '</strong> </div> ' + '<div style="float:left; width:75%;"><marquee>' + oListItem.get_item("ShortDescription")  + '</marquee>'

         '<br />';

    }
    console.log(listItemInfo);

    $("#divListItems").html(listItemInfo);
    
     console.log($(".o365cs-nav-centerAlign"));

}

function onTickerQueryFailed(sender, args) {

    alert('Request failed. ' + args.get_message() +

    '\n' + args.get_stackTrace());

}


Step5:

By Using console log window, we can check the list items are retrieving or not.


    var listItemEnumerator = collListItem.getEnumerator();

If you give the Stored variable   listItemEnumerator in console window.

You fill find

 1.Sp.ArrayList Enumerator  and click - >SpClientObjectData - >  Sharepoint list items will be display  as shown in below screenshot


Title : "Vote Now"

Short_xo220_Description  :  "Vote for favourite Year"

Note : due to space  in list item column xo220 is added


Step6:

Output


Thanks for reading my article.Stay Tune on www.webdesignersdairy.com  for more updates on SharePoint.

Validating to select in sequencial order using angular

    < input type = "checkbox" (change) = "handleSelectTaskItem($event, taskItem)" [checked] = " taskItem . i...