Search This Blog

Thursday, December 19, 2013

How to move one Virtual machine to another Virtual machine with Project files

Welcome to Designers Dairy blog here i have posted how to move one Virtual machine to another 
 
Virtual machine with Project files.
 
You can learn here how to Backup  & Restore the Files  in Virtual Machine
 
Step1:
 
Before  We move from oracle virtual box to VM player . 
 
We have to take backup our project files in virtual machine.

Step2:

There is a command tool called Stsadm (command-line tool (Office SharePoint Server)
 
 Step3:
 
Its located in 
 
C:\Program Files\Common Files\Microsoft Shared\Web Server Extensions\15\BIN \STSADM


 Step4:

STSADM - is used to take the backup  & restore of our  project files
 
Command goes here:
 
Go to Command prompt type
 
C:\ cd
 
C:\ > Cd  Program Files\Common Files\Microsoft Shared\Web Server Extensions\15\BIN 
 
C:\Program Files\Common Files\Microsoft Shared\Web Server Extensions\15\BIN >

stsadm.exe -o backup -url http://win-3qppuudegcm:50/ -filename dog.bak


Step5:


Go to the location C:\Program Files\Common Files\Microsoft Shared\Web Server 

Extensions\15\BIN 

You can c the File Dog.bak 

Step6:

STSADM - is used to take the Restore of our  project files
 
Go to Start -> search -> Developer Command Prompt For VS2012
 
Command goes here:
 
C:\ cd
 
C:\ > Cd  Program Files\Common Files\Microsoft Shared\Web Server Extensions\15\BIN \stsadm -o restore -filename c:\Fifty.bak - url http://trackerdev2008:50

 Operation completed Successfully


Step6:

Enjoy Folks 

Thursday, December 12, 2013

How to create custom page layouts in sharepoint 2013

Welcome to Designers Dairy blog here i have posted how to create custom page layouts in sharepoint 2013

Step1:

Custom page layout is nothing but  content  area design in html page . so we are  customizing
like Left div, right div and center div areas using the web part controls
Step2:
Go to Site Settings - > Site Contents -> Pages


Step3:
Go to  site settings -> Add a page 


 Step 4:

Go to  site settings -> Add a page -> Give a name -> home 

 Step 5:

 Home.aspx is created.

Now u can see the Home.aspx page with the tabs of

1.Browse
2.Page
3.Publish
4.Formattext
5.Insert


 Step 6:

Click on the page tab u will find the page layouts -> now you have to customize  your content area 
design ( page layouts)

 Step7:
Go to Sharepoint Designer 2013 -> open the url -> u will c folder page layouts - >

 u can see the default page layouts

  1. ArticleLeft.aspx
  2. Article Links.apsx
  3. BlankWebpartPage.aspx .........etc


 Step8:
 
 We have to customize the content area design as per our html design. so we have to edit any one of 
 the default page with copying orginal Blankwebpartpage.aspx page


Go to site settings -> master page layout -> click Blankwebpartpage.aspx download copy in your 
local machine desktop and change the name Sample.aspx

 Step9:
 Upload document  -> sample.aspx

 Step10:
Click Browse > and upload the sample.aspx

 Step11:
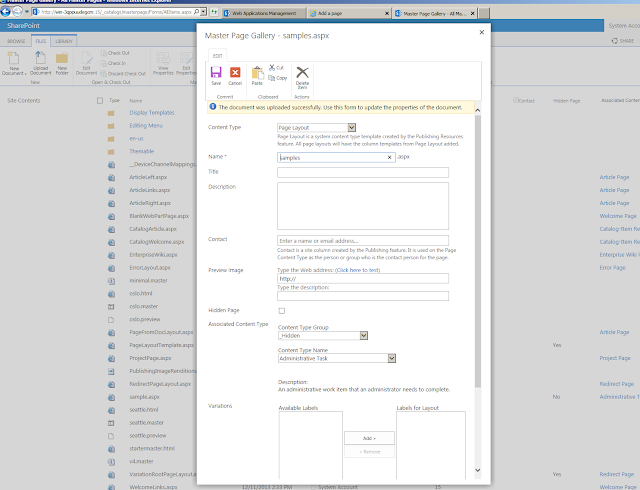
Select content type -> Page Layout -> save
 Step12:
File will be uploaded in  Page layout folders  see  screen below

 Step13:
Right click Sample.aspx -> Publish the version


Step14:

Now you go to -> site contents -> Pages -> click home.aspx -> site settings -> edit page


Step15:
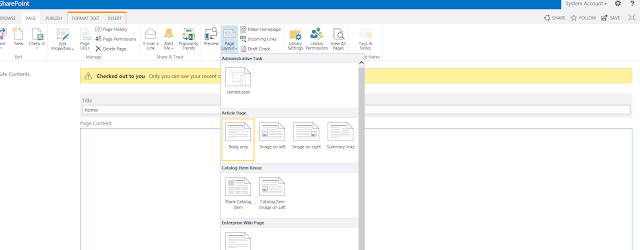
Click on page tab -> page Layout -> insert the sample.aspx 
Note:
 If u didn't publish the sample.aspx page will not display


Step16:
 Now open the sample.aspx file in sharepoint designer 2013 and edit the webparts as u need in html 
design


Remove the controls not need

Default webpart Control:
<WebPartPages:WebPartZone runat="server" Title="<%$Resources:cms,WebPartZoneTitle_CenterLeft%>" ID="CenterLeftColumn"><ZoneTemplate>
</ZoneTemplate>
</WebPartPages:WebPartZone>


Example

Custom Dog food web part Control

Title -  can be any thing

Id - any name of the webpart (ex :raid) ( while giving the id  Should not use the space)

PartchromeType="None" - For chrome Fix

Orientation="Vertical" -> for content Vertical

<WebPartPages:WebPartZone runat="server" Title="Task" PartchromeType="None" ID="Task" Orientation="Vertical"><ZoneTemplate></ZoneTemplate></WebPartPages:WebPartZone>


Sample.aspx Webpart Code:

<asp:Content ContentPlaceHolderId="PlaceHolderMain" runat="server">
    <div class="welcome blank-wp">
        <PublishingWebControls:EditModePanel runat="server" CssClass="edit-mode-panel title-edit">
           
        </PublishingWebControls:EditModePanel>
       
        <div class="ms-table ms-fullWidth">
           
                <div class="ms-table ms-fullWidth">
               
                    <section>                   
                   
                    <div class="row"><!--row div starts here-->                  
                   
                   
                    <div class="span2"> <!--left webpart starts here-->
                   
                    <div class="row">
                   
                    <WebPartPages:WebPartZone runat="server" Title="Tasks" ID="Task"><ZoneTemplate></ZoneTemplate></WebPartPages:WebPartZone>
                   
                    </div>
                   
                   
                    <div class="row">
                   
                    <WebPartPages:WebPartZone runat="server" Title="Raid" ID="Raid"><ZoneTemplate></ZoneTemplate></WebPartPages:WebPartZone>
                   
                    </div>

                    <div class="row">
                   
                    <WebPartPages:WebPartZone runat="server" Title="Project Management" ID="ProjectManagement"><ZoneTemplate></ZoneTemplate></WebPartPages:WebPartZone>
                   
                    </div>
                                                       
                   
                    </div> <!--left webpart ends here-->                                       
                   
                   
                    <div class="span6"> <!--center webpart starts here-->


                    <WebPartPages:WebPartZone runat="server" Title="Center area" ID="Centerarea"><ZoneTemplate></ZoneTemplate></WebPartPages:WebPartZone>


                    </div> <!--center webpart ends here-->                  
                   
                    <div class="span2"> <!--right webpart starts here-->
                   
                    <div class="row">                   
                    <WebPartPages:WebPartZone runat="server" Title="Key Deliverables" ID="KeyDeliverables"><ZoneTemplate></ZoneTemplate></WebPartPages:WebPartZone>
                   
                    </div>
                   
                   
                    <div class="row">
                   
                    <WebPartPages:WebPartZone runat="server" Title="Project People" ID="ProjectPeople"><ZoneTemplate></ZoneTemplate></WebPartPages:WebPartZone>
                   
                    </div>

                    <div class="row">
                   
                    <WebPartPages:WebPartZone runat="server" Title="Notebook" ID="Notebook"><ZoneTemplate></ZoneTemplate></WebPartPages:WebPartZone>
                   
                    </div>                                                      
                   
                    </div> <!--right webpart ends here-->

                    </div><!--row div ends here-->
                    </section>
                                  
                </div>               
            </div>       
            <SharePointWebControls:ScriptBlock runat="server">if(typeof(MSOLayout_MakeInvisibleIfEmpty) == "function") {MSOLayout_MakeInvisibleIfEmpty();}</SharePointWebControls:ScriptBlock>
        </div>
    </div>
</asp:Content>

Step17:
 Now u can see the output by refresh the sample.aspx page. As per our html design  the css has not 
applied  because i have not applied the master page layout

So i have to add the styles in custom page  (if u add in masterpage its not neeeded)

 <SharePointWebControls:CssRegistration name="<% $SPUrl:~sitecollection/Style Library/dogfood/css/base.css %>" runat="server" after="SharepointCssFile"/>
    <SharePointWebControls:CssRegistration name="<% $SPUrl:~sitecollection/Style Library/dogfood/css/icons.css %>" runat="server" after="SharepointCssFile"/>
    <SharePointWebControls:CssRegistration name="<% $SPUrl:~sitecollection/Style Library/dogfood/css/Layout.css %>" runat="server" after="SharepointCssFile"/>
    <SharePointWebControls:CssRegistration name="<% $SPUrl:~sitecollection/Style Library/dogfood/css/Typography.css %>" runat="server" after="SharepointCssFile"/>
Step 18:
 Now the Styles had been added  See the page lout design

Enjoy Folks

Validating to select in sequencial order using angular

    < input type = "checkbox" (change) = "handleSelectTaskItem($event, taskItem)" [checked] = " taskItem . i...